How to Draw a Plum Step by Step
How to draw a plum in six steps is what is shown in this guide. It provides illustrated examples and quick instructions.

The plum in the example is a “black plum” these are also known as Japanese plums. The drawing is done in a simplified style with clearly visible outlines and “flat” colors. Drawing in such a way can create some beautiful artwork similar to what you can find in 2d animated shows or comic books. Due to it’s simplicity this style is also quite beginner friendly. So weather you want to try and improve your artistic skills or just want to draw something easy for fun, this quick plum drawing tutorial can help.
Be sure to start in pencil and make light lines as you will need to erase a part of the plum’s outline when adding the leaf. You can trace over your lines later on to darken them.
Step 1 – Outline the Plum’s Shape & Draw the Split

First, outline the main shape of the plum. Plums of this kind are usually fairly round so you will want to draw it accordingly (as shown in the example). Next, draw the split. Draw the line that defines it running along one side of plum and then curving towards it’s other side near the top. Also, draw a bit of a downwards curve near the very top of the split to create the area that the stem grows out of.
For drawing another fruit with a similar shape see:
How to Draw a Peach in Six Steps
Step 2 – Draw the Stem

Draw the stem coming out of the upper split area added in the previous step. Make it slightly curved. Also, define the stem’s upper surface (where it’s been cut off) by drawing a little downward curve near it’s top. This will make it like it’s bent slightly towards the viewer.
Step 3 – Draw the Leaf

Generally plum leaves don’t grow from the area shown in the example. However, as this drawing is somewhat stylized you can add the leaf as coming out of the plum’s stem. You can first draw the petiole/midrib (large vein through the middle of the leaf) and then draw the blade around it. As already mentioned at the start of the tutorial, you will need to erase a part of the plum’s outline when adding these in.
Step 4 – Draw the Leaf’s Veins

To complete the line drawing first add some veins running out from both sides of the midrib. You can show each with just a single curved line. Real leaves would generally have a lot more veins but to keep things simple you only need to show a few.
For drawing more detailed leaves see:
Once you’ve drawn out the leaf you can trace over your lines to darken them. A thin black marker can be a good way to do this though you can also simply use the pencil.
Step 5 – Color the Plum

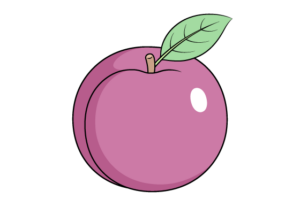
To color the plum you can make it purple, the stem brown and the leaf green. Use can also use whatever media you have available (colored pencils, markers, paints, etc…).
In this example the plum is colored/shaded as though the light is coming from the upper right.
When coloring the plum leave a little white spot along the upper end of the side opposite the split. The white spot will create a sense of a bright reflection, This will help convey that the plum has a smooth surface.
When coloring the stem you can make it’s upper area (above the little curve) slightly lighter than the rest (as this part faces more towards the light). However, this is a very tiny detail and can be omitted.
Step 6 – Add a Shadow

For the final step of the drawing add a shadow. Draw it starting along the plum’s bottom and curving all the way up along the side facing away from the light (on the left in this case).
As the goal of the tutorial is to create a drawing in a style similar to those used in 2d animations there is no need to add a transition between the light and dark areas. Simply give the shadow a hard edge.
Drawing in such a way (flat colors with no gradients) also makes markers a viable coloring option.
Conclusion
This guide shows how to create a nice looking but simple drawing of a plum. To accomplish this it uses a style similar to those you can find in cartoons, anime, and comic books. At the same time the plum shown as the example still has a fairly realistic overall shape and it’s light and dark areas are placed in a logic way.
If you like these kinds of easy to follow step by step drawing guides also be sure to try the following:

")