How to Draw a Pretty Girl Face in 12 Steps
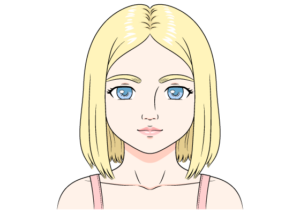
This tutorial explains how to draw a pretty girl’s face. All of the facial features are drawn in different steps to make it easy to follow along.
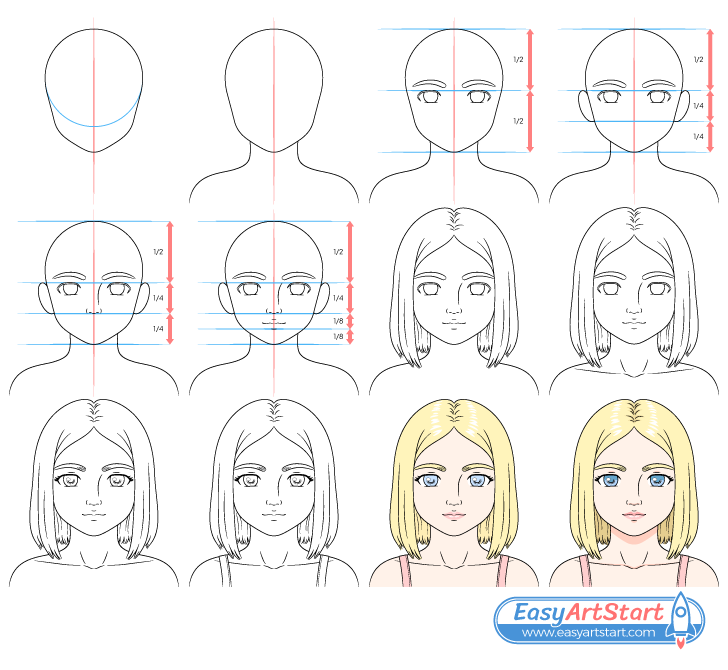
The drawing of the girl’s face is created with a mix of several different art styles. Some parts are done in a fairly realistic manner while others are closer to what you may find in comic book, cartoon or anime. Drawing in such a way allows for a lot of flexibility and can make it much easier to create a beautiful looking face. It can also help you produce more original and interesting looking artwork than if you were to focus on one particular style.
In this example the girl has fairly stylized eyes that help give her a cute (and young) appearance. The nose and mouth are somewhat simplified but have more realistic proportions.
In additional to showing how to create a pretty looking female face the tutorial is filled with very useful drawing advice that can be applied to art in general. It shows how to use basic guide lines to help avoid mistakes. It also teaches you to be aware of proportions or in other words of how the size and placement of one part of the drawing relates to another. Furthermore, the guide shows a good drawing order of starting from the largest parts of a subject and working down to the small details. All of these can be very helpful regardless of what style you use.
Unless you are going to be drawing digitally start it in pencil and be sure to make light lines that don’t leave marks when erased. This is important as the tutorial is designed in a way where some erasing is required in a few of the steps. You can trace over your lines to darken them once you have the girl fully outlined.
The steps in this tutorial cover the following:
- Drawing a pretty girl’s head
- Drawing a the neck and shoulders of a young person
- Drawing big beautiful eyes and positioning them on the head
- Drawing ears and placing them on the head
- Simplifying, drawing and positioning a nose on the head
- Drawing a mouth and positioning it on the head using the lower lip
- Drawing hair by breaking it up into several sections
- Drawing simplified collar bones and neck muscles
- Drawing the shoulder straps of a dress
- Drawing small details of the eyes (pupils, reflections, etc…)
- Using a good color combination
- Applying simple shading with no gradient
Step 1 – Draw the Girl’s Head
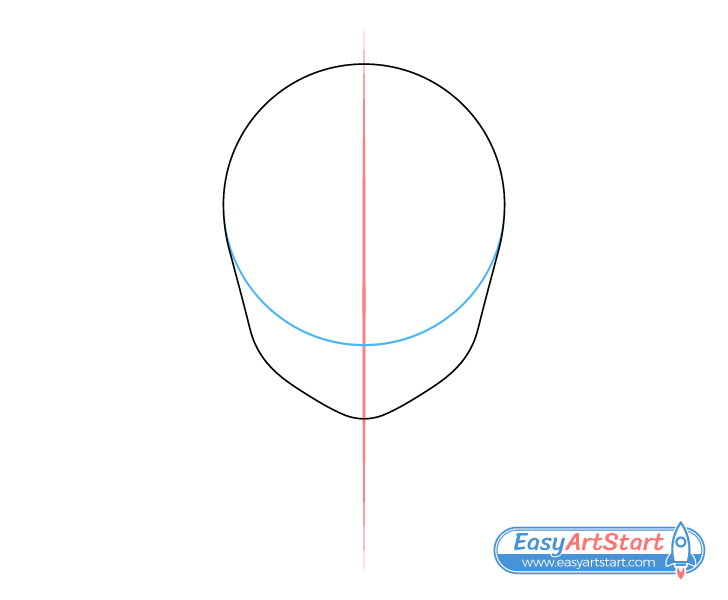
Start by drawing an outline of the head. First, make a straight vertical line through the middle of the area you will be drawing inside of. This should be just a little taller than you intend to make the drawing itself.
The purpose of this line is to act as a guide that can help with several things. For this step it can make it easier to see if both halves of the head are relatively even in width. Later on it can also help in seeing if the eyes are evenly spaced and if the nose and mouth are properly centered. The line can also help you insure that the drawing doesn’t get skewed. Just be sure that it’s actually straight otherwise it will not make for a proper guide.
Near the top of the guide line draw a circle to get a basic shape of the top of the head. This will be covered by the hair but you still want to fully draw it out to be able to properly position the facial features (as well as for other reason explained later on).
Going down from the circle draw the lower part of the head/face. First, make it’s sides fairly straight and draw them angled towards the center of the head. Next, draw the curves of the cheeks follow by another pair of fairly straight sections that define the jaw (angled even more towards the center). Finally, join both sides with a curve to define the chin. This should give you a basic outline of the head.
You can erase the lower part of the circle once you have the head outlined. In case you are wondering why you needed to draw the entire thing instead of just the half, it’s simply because doing so make it easier to see if it’s actually round. If you were to just draw the half it would be harder to tell if it would actually create a proper circle once completed.
Step 2 – Draw the Neck & Shoulders
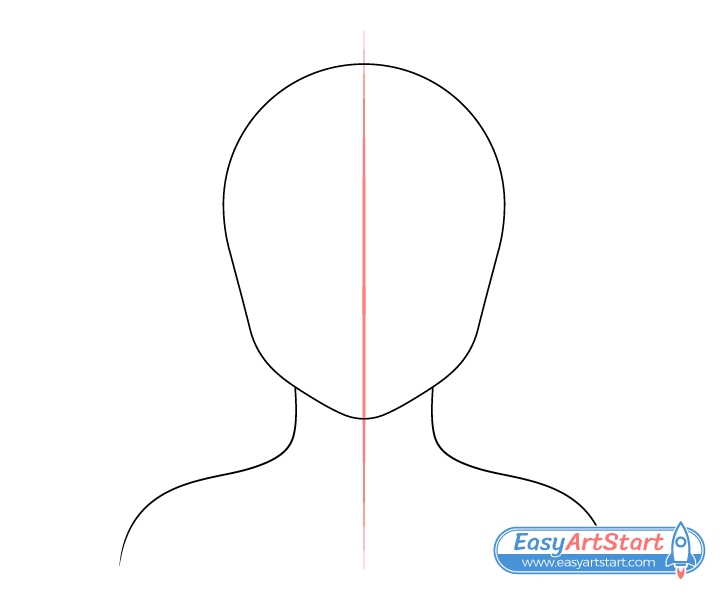
As this is a portrait style drawing you don’t need to worry about showing too much of the body but you do want to show some.
Going down from the lower part of the head add the neck followed by the shoulders. As this is a young girl and the drawing is somewhat stylized you can make the neck the neck fairly slender and the shoulders quite narrow in relation to the head.
Draw the sides of the neck gradually curving outwards (away form the center) as they go down and transitioning into the shoulders. Define the shoulders starting with a pair of fairly straight downwards angled areas and then with downwards curves.
Step 3 – Draw the Eyes Below the Horizontal Halfway Point of the Face
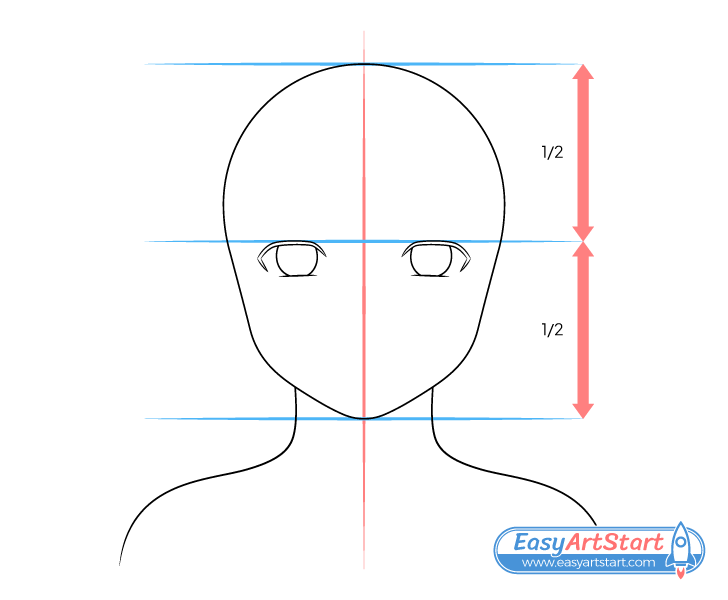
This guide has been put together in a way where placing the facial features has been made very easy (as you will see in these next few steps).
Although the drawing is stylized the facial features are placed very close to those of real people.
As this is a young person you want the eyes to be lower down than they would be for an adult. Position them directly below the vertical halfway point of the head. It can be helpful to draw a straight horizontal line to estimate their placement and to also help make sure that both are on the same level.
The eyes are done in a way that is similar to those you find in anime where they are mainly defined by their eyelashes with the inner ends left open. At this stage of the drawing only add their basic outlines (without the smaller details) as shown in the example. First, draw the eyelashes to define their shapes and then add the irises. Leave the rest for later.
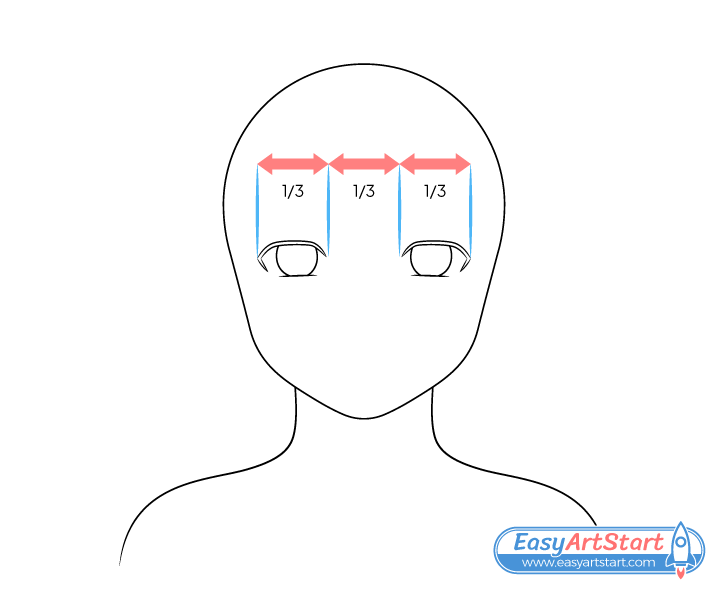
Make the eyes quite big and space them roughly far enough apart that they have the distance of the width of one eye in between them.
Big eyes are generally considered beautiful and also tend to make a person look younger. As the goal of the tutorial is to create the face of a pretty young girl drawing large eyes is definitely a good choice in achieving that.
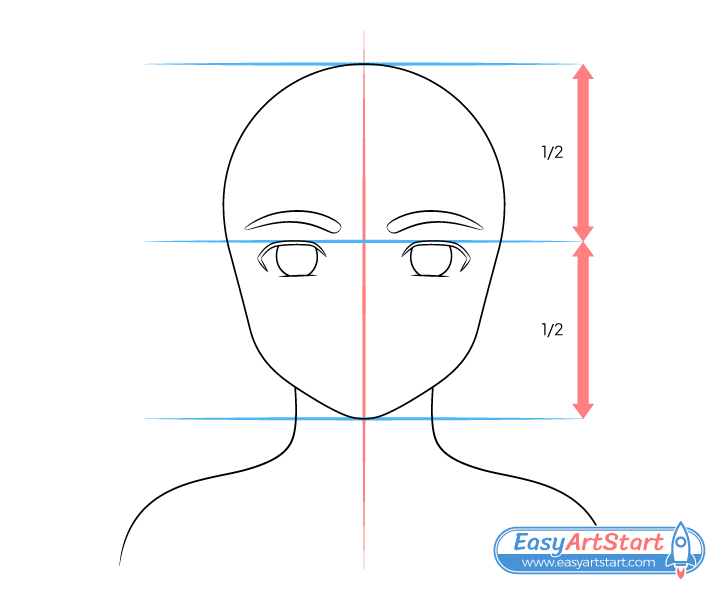
Above the eyes draw the eyebrows. In this case they are done with fairly realistic shapes.
Draw each eyebrows to be curve and thicker towards it’s inner end. Also, draw the inner ends of both eyebrows slightly lower down than their out ends (but not too much so or you will get a frown).
Step 4 – Draw the Ears Lined up With the Top of the Eyes
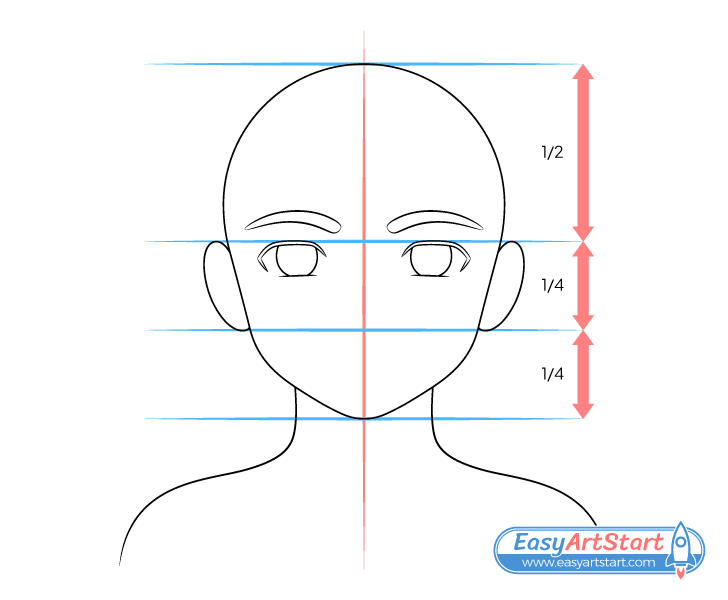
Draw the ears with their upper ends lined up with the top of the eyes and their lower ends halfway between the top of the eyes and the bottom of the chin.
In later steps the ears will be fully covered by the hair so you don’t necessarily need to add them. However, it’s good to be aware of their placement and drawing them also lets you see how much volume the hair needs to have in order for them to be fully covered by it.
Step 5 – Draw the Nose Between the Eyes & the Chin
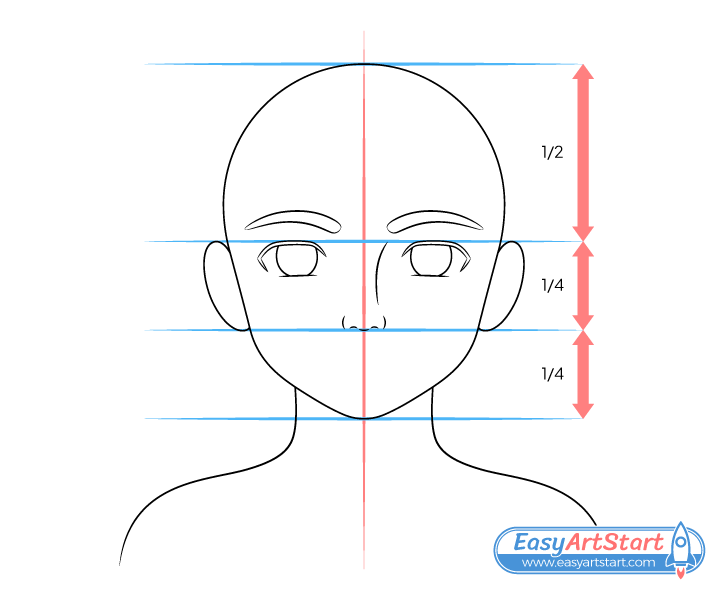
Place the nose the same as the ears with it’s upper end lined up with the top of the eyes and it’s lower end halfway between the top of the eyes and the bottom of the chin.
In this case the nose is drawn similar to something you can find in a comic book or a cartoon. It has a fairly realistic shape and size but only one side of it’s bridge is defined. The reason it’s done this way is because the drawing will look odd if you define both sides.
Step 6 – Draw the Mouth Between the Nose & the Chin
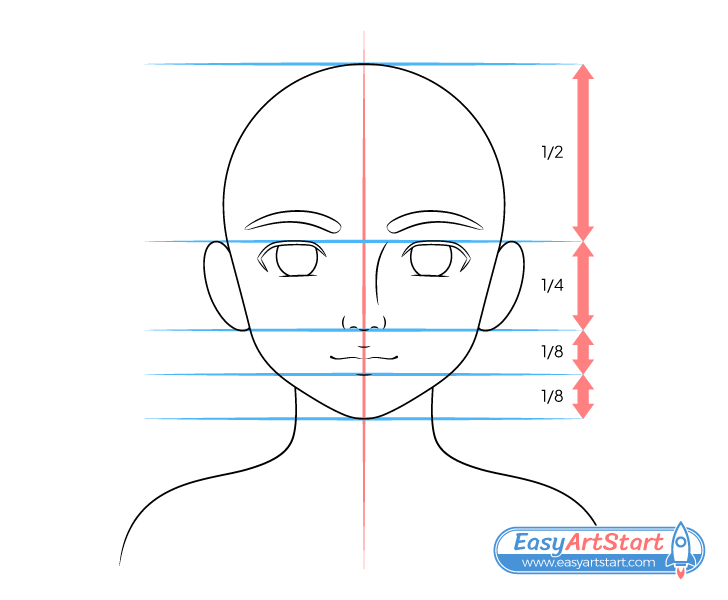
Position the mouth with it’s bottom lip halfway between the bottom of the nose and the bottom of the chin.
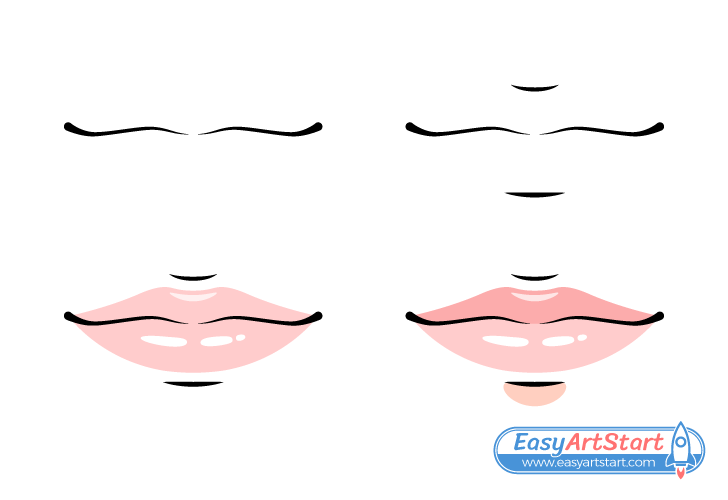
You can see the entire drawing of the mouth and lips done step by step in the example above. Save the coloring and shading for the last two steps of the tutorial but draw it’s shape as shown.
Start with the mouth. Draw it’s outer corers curved upwards and give it a downwards bump with a tiny split in the middle. The split will keep the drawing looking more organic and less like a wire frame.
Next, draw a hint of the upper and lower lip as one small curve each. The rest of the lips will be define by the color as shown (again, save this for later). The reason you don’t want to outline the entire area of the lips is because using just the color will make them look softer and more like those of a young person.
For drawing the lips in a different way see:
How to Draw Beautiful Lips in 6 Easy Steps
Once you’ve added the mouth you can erase all of the vertical and horizontal guide lines before moving on to the next step.
Step 7 – Draw the Hair
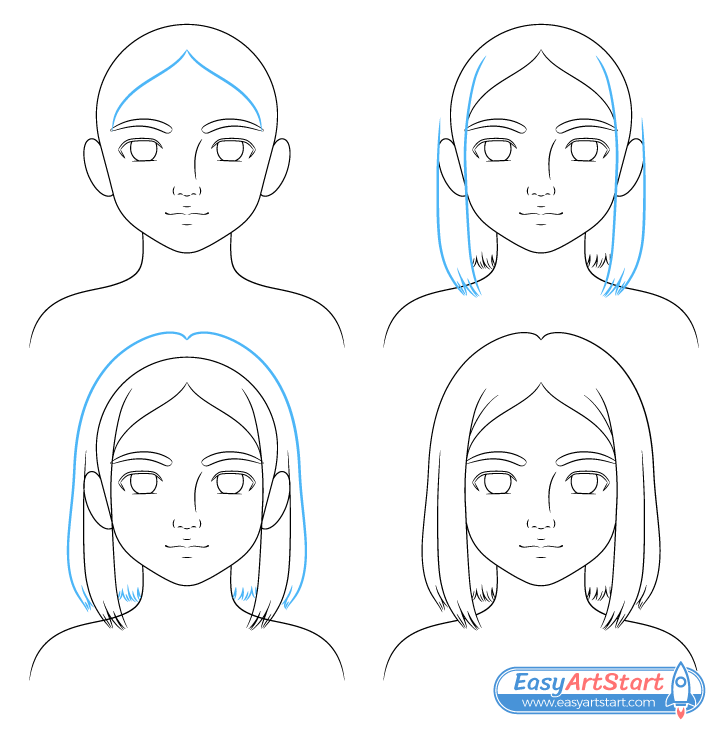
Drawing hair can be complicated and confusing. However, the method used in this tutorial can make the process significantly easier to manage and understand.
The initial part of simplifying the hair drawing process was already done in the first step of the tutorial. By outlining the entire head you can easily see just how much volume you are giving to the hair and where you need to place it. When done properly this makes it less likely that you will end up creating a misshaped head.
To make drawing the hair even easier you can think of it as being comprised of several different sections as shown in the step by step example above and explained below.
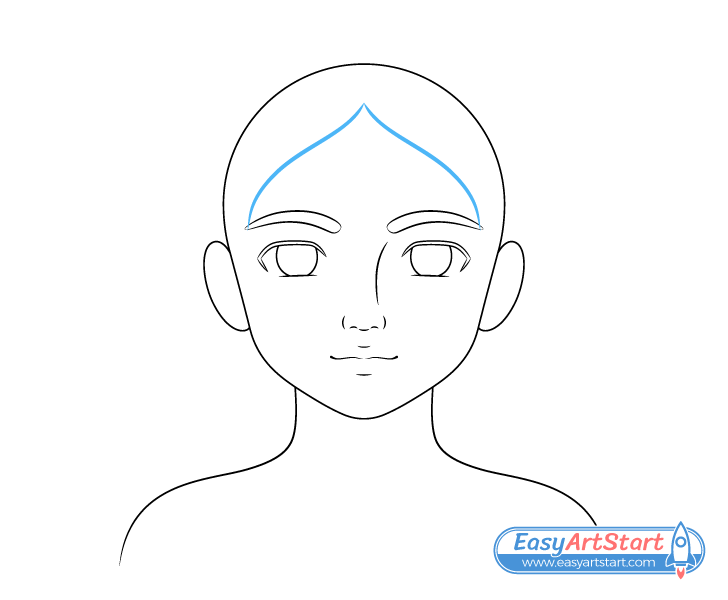
First, draw the hair along the forehead area of the head. In this case it’s swept to each side of the head with a split in the middle. Define each side with wave like line that first curve in one direction and then in the other.
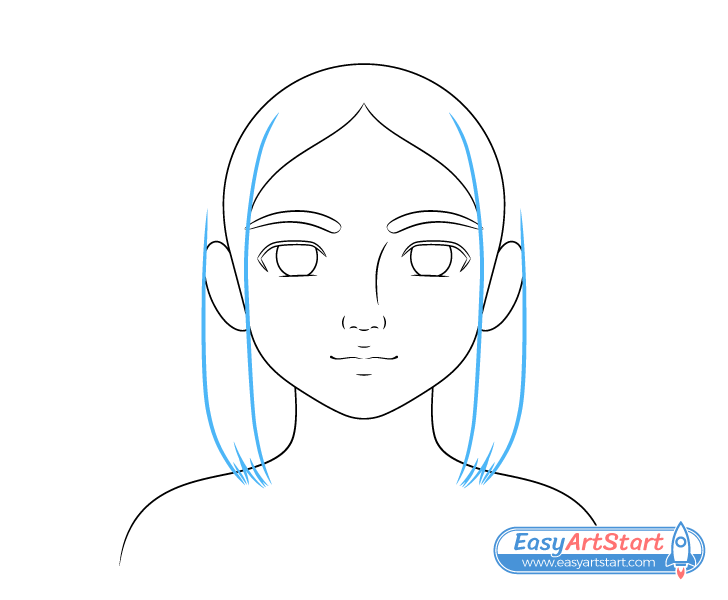
Next, add the sides of the hair. Draw these slightly curved towards the head as they go up and down. First, outline their main shapes and then add the splits on the ends. Try and make the splits of slightly different sizes. Also, leave the outer tips of the splits open. This will make the hair look softer and more natural. Drawing more spiky ends will look more like cartoon or anime hair.
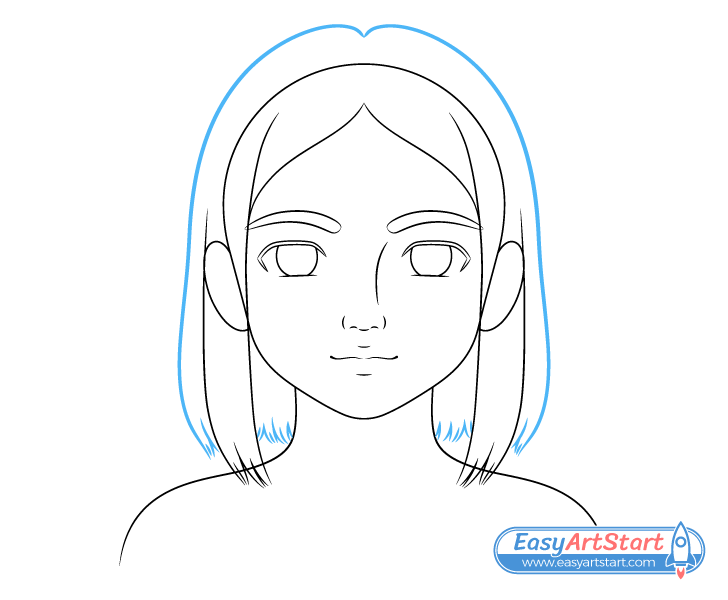
Finally, draw the hair that is a more in the background as compared to the previous two areas. This is the largest section that starts from the top of the head and runs down to just above the shoulders.
Add this hair starting from the split at the top. As was already mentioned, drawing the head out earlier makes it easy to see how much volume you are giving the hair (this part of it in particular). Draw it’s outline slightly farther from the head (more volume) at the very top then slightly closer to it as it goes down (less volume). As the hair goes past the ears again draw the outline moving slightly away form the head to show that the hair fans out as it goes down. Define the bottom of this area as a series of little splits similar to those on the ends of the sides.
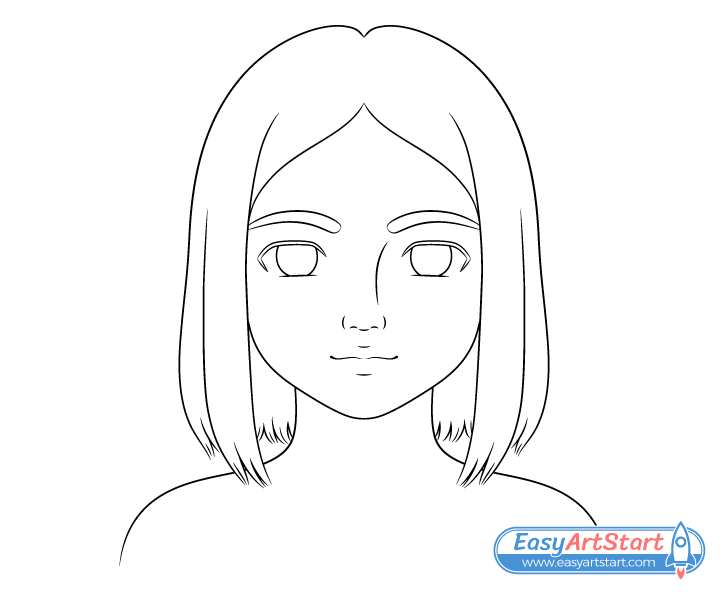
Once you have all of the major sections of the hair outlined you can erase the parts of the head that are covered by it.
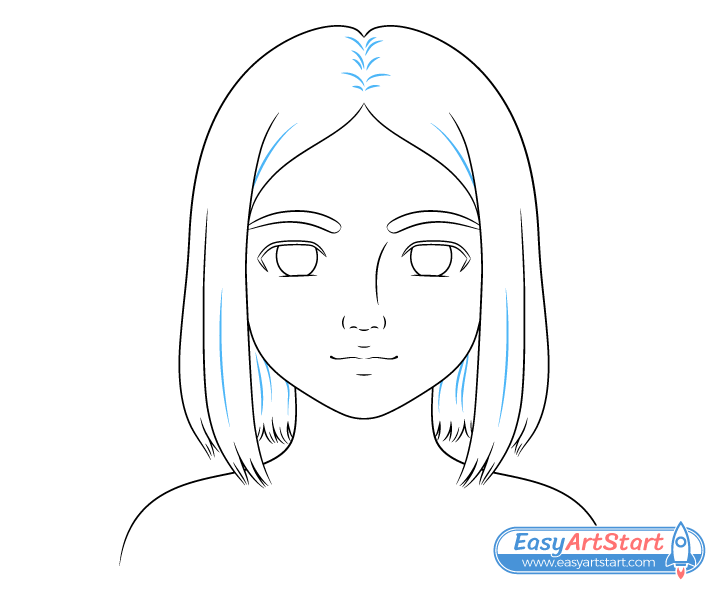
Once your drawing is cleaned up you can give the hair a little more detail by adding some splits and folds into it as shown above.
Add these in the following areas:
- A series of little folds along the split at the top/middle (make these of slightly different length)
- A pair of folds in the side swept forehead parts of the hair
- A pair of folds along the side areas
- Several folds along the inner background area (in between the neck and sides)
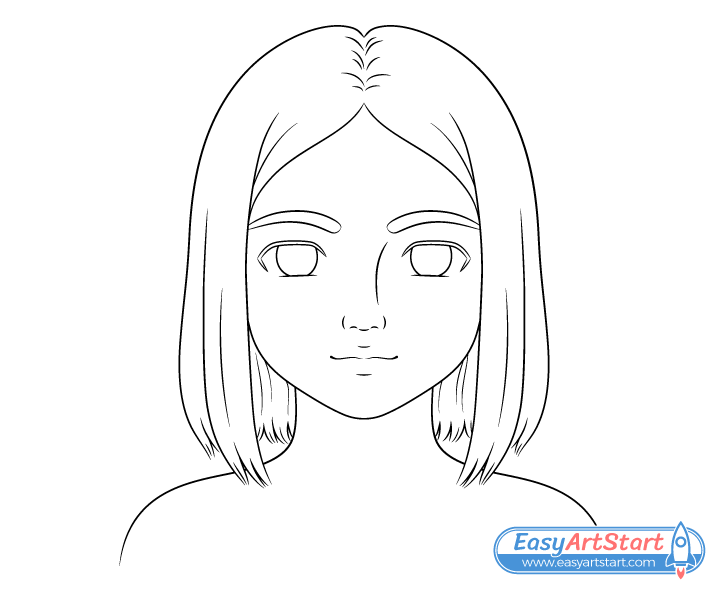
Once done you should have a drawing similar to the above.
Step 8 – Draw the Collar Bones
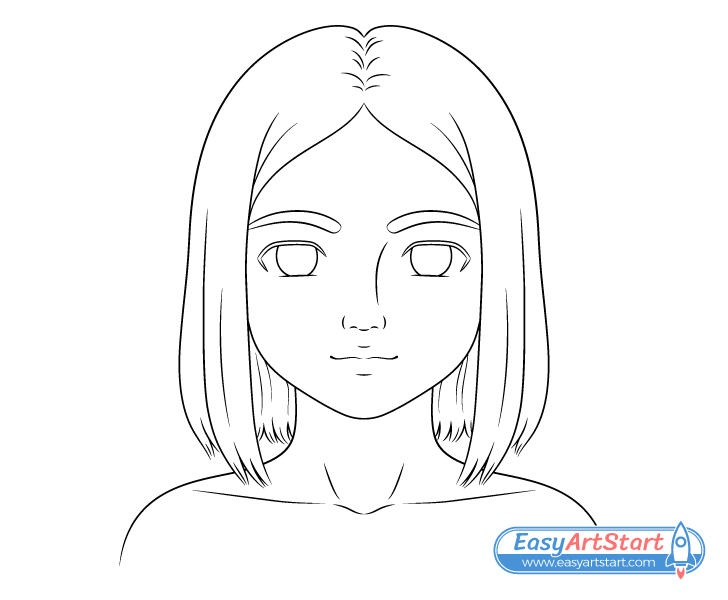
Draw the collar bones and hints of the neck muscles.
Place the collar bones starting from the areas where she shoulders begin to curve downwards and draw them running down towards the bottom of the neck with a downwards curve in the middle. Afterwards, show a bit of the neck muscles as a pair of lines going up from this curve.
Generally the neck muscles run all the way to behind the ears. However, in young people and especially girls muscles tend to be a lot less pronounced.
Step 9 – Draw the Details of the Eyes
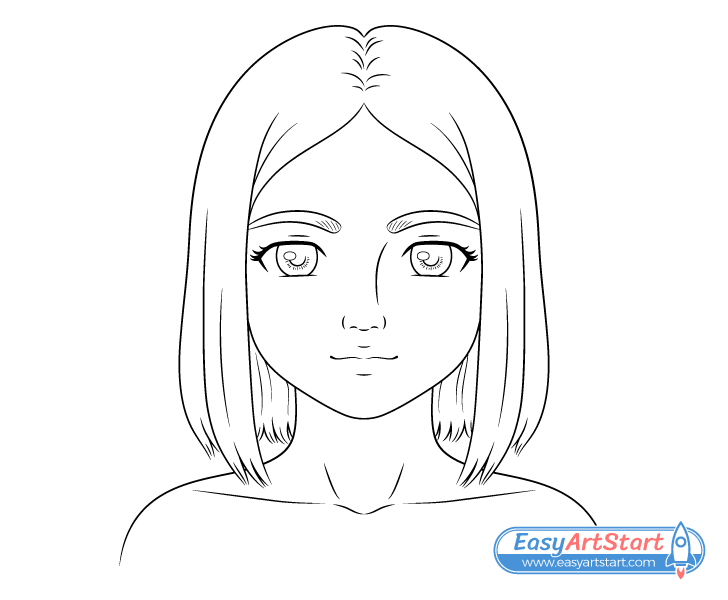
For this step add the smaller details of the eyes and eyebrows. Draw the pupils (and surrounding details), reflections, hints of individual lashes, eyelids and hints of individual hairs along the eyebrows.
As the eyes are so detailed they have their own separate step by step tutorial where you can see all of these everything more clearly. It can be found here:
How to Draw Beautiful Eyes in 10 Steps
Step 10 – Draw the Clothes
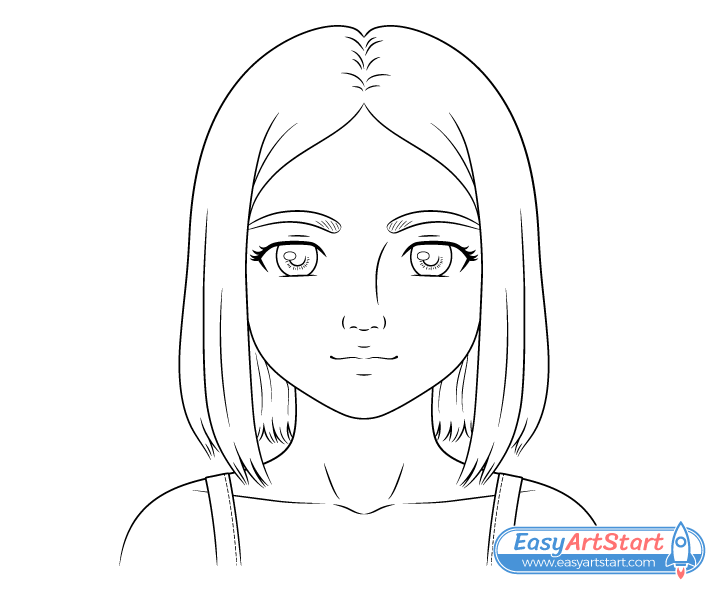
In this case the only visible part of the clothes are the shoulder straps of the dress. Draw these slightly curve and angled towards the middle of the body. Once you have each strap outlined draw a series of dashes along their inner ends to create an effect of stitches. This will make the straps look a little less plain and will help show that they’re made of fabric. You will need to erase a bit of the collar bones when adding these in.
After you have the straps drawn out you should have all parts of the girl outlined. If you are happy with how your drawing looks trace over it to darken your lines. Otherwise make any revision you feel are required prior to doing so.
Step 11 – Color the Drawing
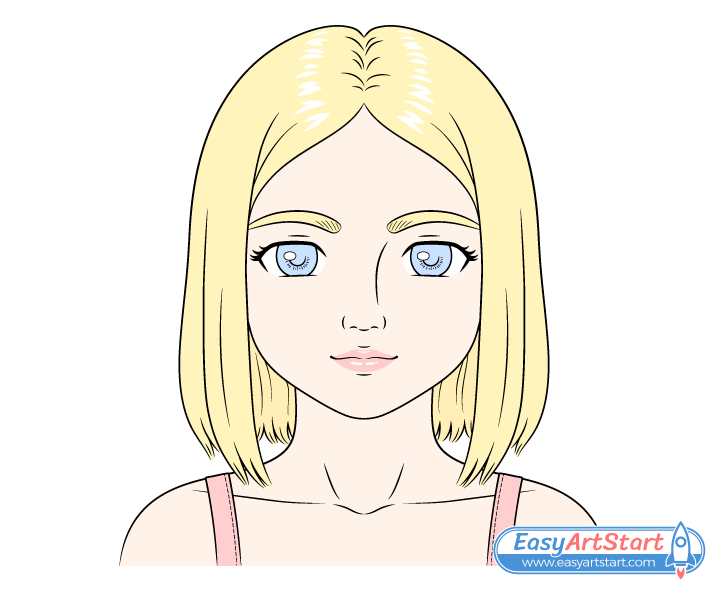
Applying color this drawing is fairly easy. The only thing you have to keep in mind is that you will want to leave some white reflections in the hair, eyes and along the lips. These will show light reflecting from their surface and will help make the hair look shiny and the lips and eyes moist. Leaves the whites of the eyes white as well.
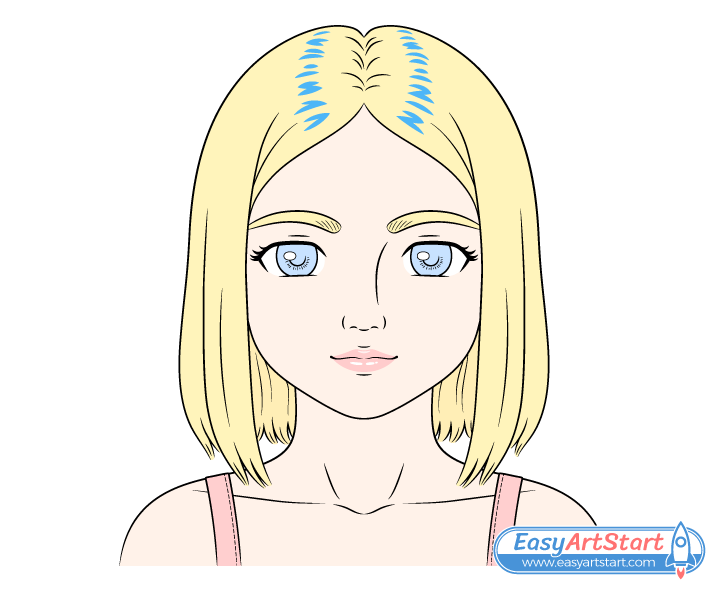
You can see the shapes of reflections in the hair shown above in blue as it may be a little difficult to see them in white.
The reflections in the eyes can have a dark outline to make them stand out but don’t add these around those in the hair or on the lips. You can VERY lightly outline the hair/lip reflections and the whites of the eyes in regular pencil just to make sure you don’t accidentally color over them.Try and make the lines so light that they basically blend into the color. This way you don’t need to erase them and risk smudging things.
If drawing digitally creating the reflections is much easier. You can simply add them over top of the color (usually in a new layer).
Alternatively, you can add the reflection over top of the color on paper by using a white correction pen (with a thin enough tip).
When coloring fill in the different area of the girl as follows:
- Hair – yellow
- Eyebrows – yellow
- Eyes – blue
- Lips – pink
- Dress – pink
- Skin – light pink/orange
The yellow will show blonde hair. Blue and pink go well with yellow and therefore are good choices. However, you can use a different color combination if you like.
Step 12 – Add the Shadows
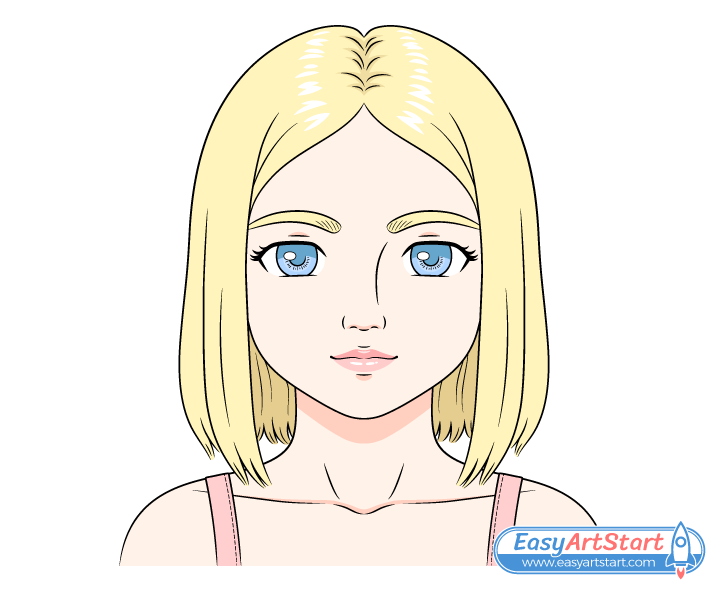
You may notice that in the previous illustration looks a little plain. You can fix this by adding some shadows as shown in the example above.
Adding even a little bit of simple shading to a drawing can make it stand out far more than just colors.
In this case the shadows are done with no gradients. You can find this kind of shading in cartoons and comic books. It’s generally much quicker and easier to apply but is still quite effective.
The position of the shadows shifts depending on which direction the light is coming from. In this example the shadows are done as though the main light source is above the girl. In such a setup they will mostly be cast downwards. However, indented or closed off areas will also tend to have shadows as usually less light will reach them.
Before adding the shadows darken the pupils and upper areas of the irises of the eyes. The pupils are naturally darker and shading the top of the irises will prevent the girl from looking like she’s staring.
Add the shadows as follows:
- Around the fold in the split in the hair
- Above the eyelids
- Along the bottom of the nose
- Along the entire upper lip
- Below the bottom lip
- Along the upper area of the neck
- Along the entire inner area of the hair (between the neck and the sides)
- Above the collar bones
You can create the shadows by either using a darker variant of the corresponding color or by lightly going the color with a regular pencil.
Conclusion – Mixing Different Art Styles Can be Fun and Using a Good Approach to Drawing Can be Helpful
This guide shows how to draw a pretty looking young girl using a combination of several different art styles. By exaggerating or stylizing certain facial features you can more easily give a person a particular look. In this case drawing big beautiful eyes while making other features less pronounced helped give the girl a younger and more beautiful appearance.
Drawing in such a way can also be quite fun as it allows you to get really creative as compared to a more traditional style.
In addition to using using a mix of different styles to get a pretty looking girl the tutorial provides many great overall drawing tips. These include using basic guide lines, being aware of proportions, using a logical drawing order and drawing out things that are hidden to help avoid mistakes later on.
If you would like to try more step by step drawing guides done in a similar style also see:

