How to Draw a Cute Dog Step by Step
This tutorial shows how to draw a cute dog in a simple style with straightforward step by step instructions.
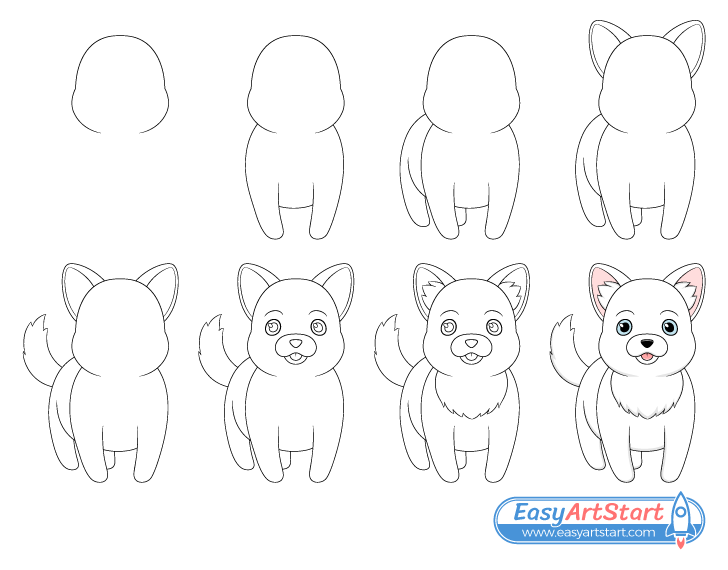
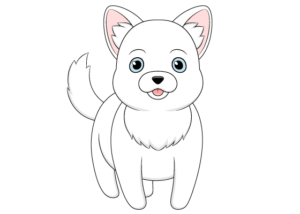
The dog in the example is drawn similar to something you might find in a cartoon, anime or a comic book. Using such a style both makes the guide easier and helps give the animal a cute appearance. Also, please note that sometimes cute looking small dogs tend to look like puppies so this example can be used for drawing a puppy or a dog that is fully grown.
In addition to simply helping you draw a cute dog the guide also teaches some good overall drawing practices. These include being aware of proportions (comparing the size of one part of the dog to another), adding the different parts of your subject in a logical order and properly positioning them on the page or drawing area.
Although this guide is designed in a way where ideally you don’t need to do any erasing you should still start the drawing in pencil just in case you happen to make a mistake. Also, try and use fairly light lines until you have all parts of the dog drawn out. You can then trace over them with a black marker or darken them with the pencil.
Step 1 – Draw a Big Head
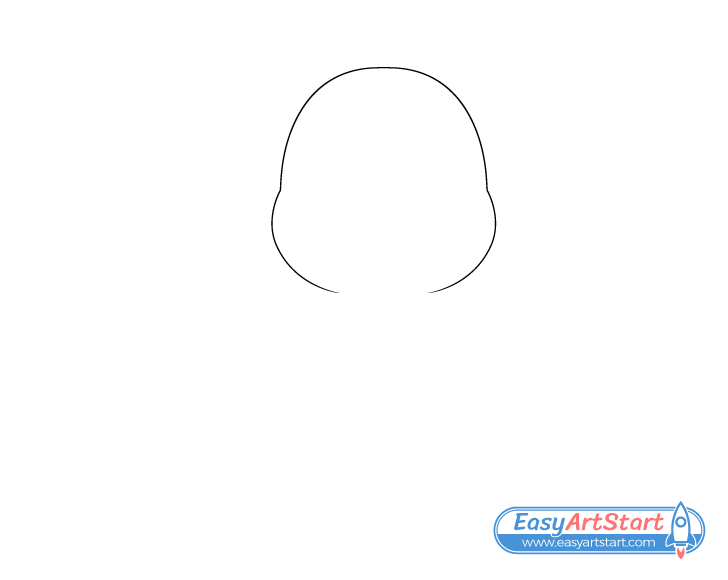
Begin by drawing the dog’s head as shown in the example. Outline it’s overall shape without any of the facial features (save those for a later step).
As in the example, define the head’s shape with three curves, a large one for it’s upper area and a smaller pair for the cheeks. Leave the bottom of the outline open.
When positioning the head be sure to leave enough room below for the body and above for the ears. You will also want to position it slightly to one side of your drawing area (closer to the right in this example) as you will want there to be a little extra room on the other side for the tail.
Step 2- Draw the Front of the Body & the Front Paws
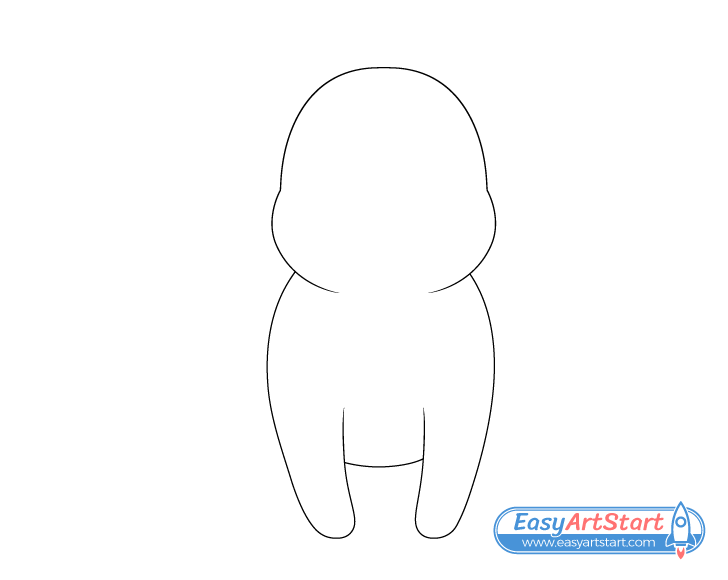
When drawing the dog’s legs outline their shapes in a way where each one is curved inwards (towards the center of the body) and gets a little narrower as it goes down. Also, make the legs fairly short and the body fairly small in relation to the head. You want a big head for a cuter looking animal.
Draw this part of the dog starting with a pair of curved lines to define the sides of the body and the sides of the front legs. Continue these lines to define the curves of the feet followed by the inner sides of the legs.
Once you have each leg outlined connect them with a curve to define the bottom of the forward facing side of the body. Make the body roughly as tall as the head.
Step 3 – Draw the Side of the Body & Back Paws
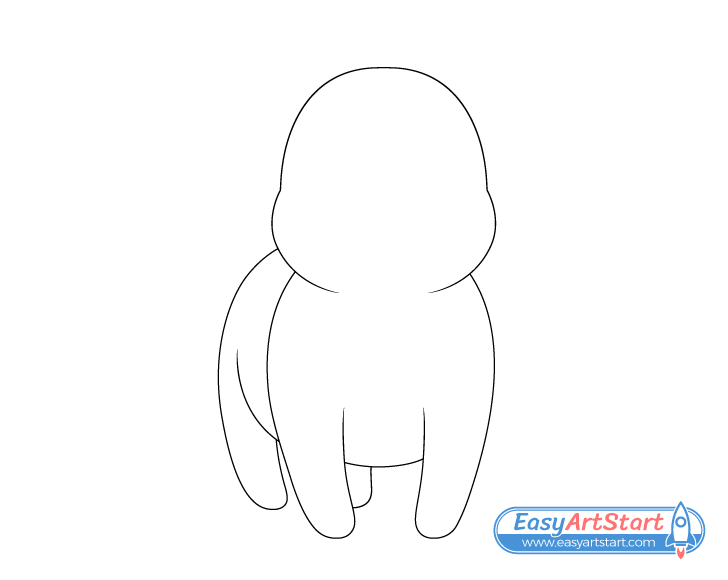
In this example the dog’s body is angled slightly to one side. Show this side by first drawing an upwards curve that is basically an extension of the one used to define the forward facing part of the body.
Afterwards, draw a curve running down from the side of the head to define the body’s upper area and extend this downwards to define the side of the back leg. Just like for the front legs further extend this line to define the curve of the foot and then the inner side of the leg.
Most of the dog’s second leg is hidden behind it’s front leg/body. You can draw the little bit that is visible as shown in the example (coming out from behind the front leg on the left).
Make the overall shapes of the back legs similar to those of the front legs but make them smaller to show that they are farther back.
Step 4 – Draw Big Ears
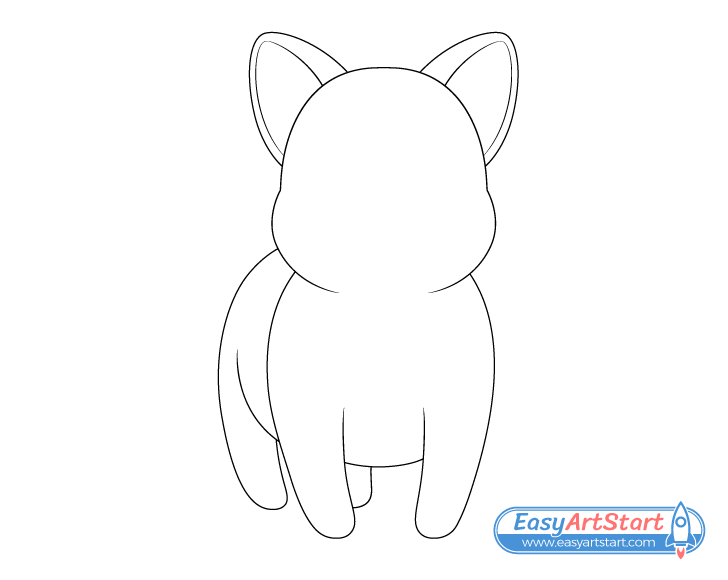
On top of the dog’s head draw a pair of ears. As the goal is to create a cute looking dog make the ears fairly large (animals with large ears tend to look cuter).
First, define the outer shape of each ear and then draw the openings. To show that the ears are angled slightly sideways position the openings closer to their outer ends.
Step 5 – Draw the Tail
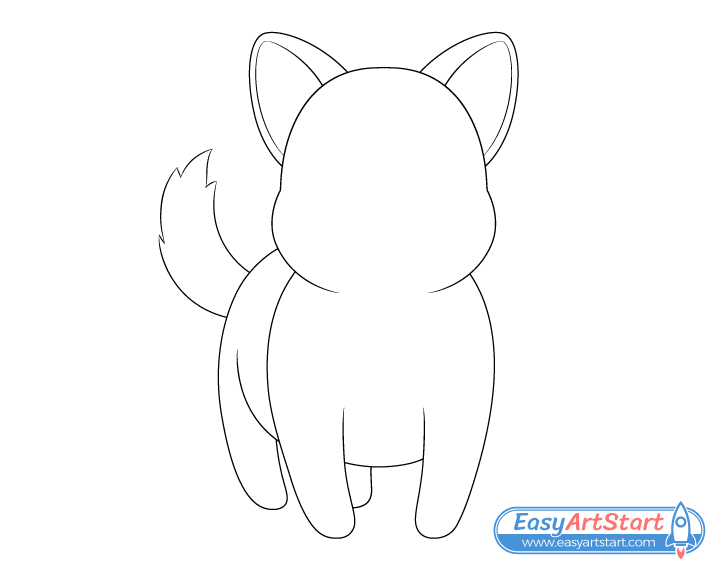
Sticking out from the rear area of the body draw a raised and slightly curved tail. To help show that it’s covered in fur add a few splits around it’s end to create a sense of little fur clumps. Make the clumps of different shapes and size so that they look natural.
Drawing a raised tail will help give the dog a more playful posture as dogs generally was their tails when they’re happy.
Step 6 – Draw the Face
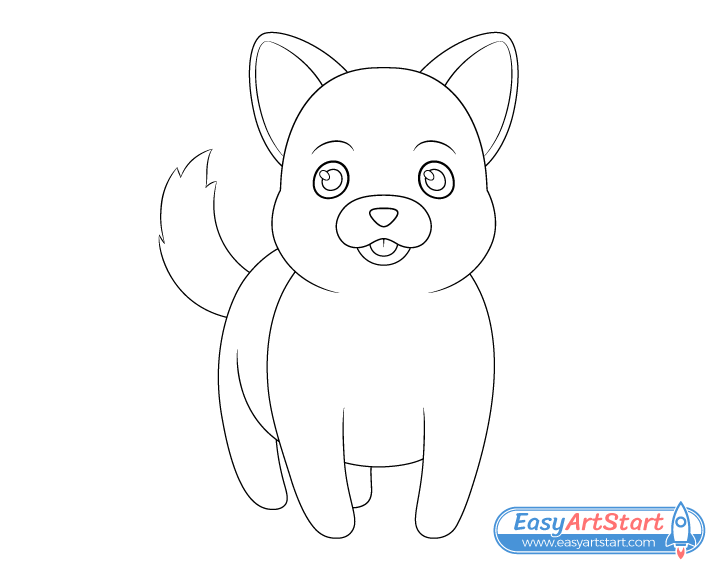
Draw the dogs face starting with the eyes. Position them halfway down the head. To again help make the dog look cute draw the eyes to be fairly big.
Inside each eye add a pupil with the same shape as the eye itself but smaller. Position the pupils slightly closer to the inner sides of the eyes and draw oval shaped reflection overlapping each of them. Be sure to position the reflections to the same side of each eye.
Above the eyes add a hint of the eyebrows with a pair of small curves. Draw the inner ends of the eyebrows slightly raised to give the dog a bit of an exited look, the kind of expression that dogs might have when they want you to play with them.
Below the eyes draw the top of the snout (shaped similar to an an upside down bean). Outline the bottom of the snout as a single curve.
On the upper part of the snout draw the nose shaped a bit like an upside down triangle with rounded corners and curved sides.
Finally, sticking out from the beneath the upper part of the snout draw the tongue. You can again define it with a simple curve. Also, draw a little line down the tongues middle to show the crease that tongues generally have in that area.
Showing the tongue will yet again help give the dog a cute and slightly silly look.
Step 7 – Draw the Fur
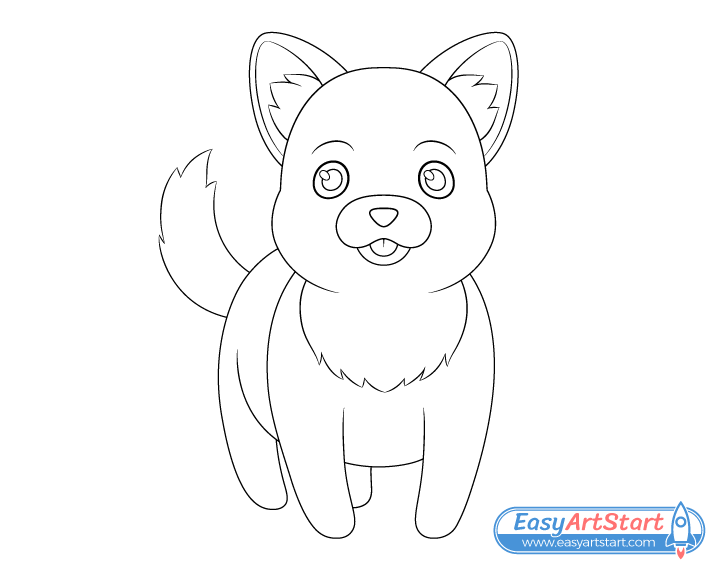
Add some fur sticking out of the ears and add a little mane below the head. You can draw the fur in little clumps similar to those on the tail. Again, try and vary their shape and size so that they looks natural.
Adding the fur will help give the dog a more fluffy look and will also help make the drawing more interesting and less plain.
Once you’ve added the fur clumps you can trace over your lines with a thin black marker or darken them with the pencil.
Step 8 – Add Some Color & Shading
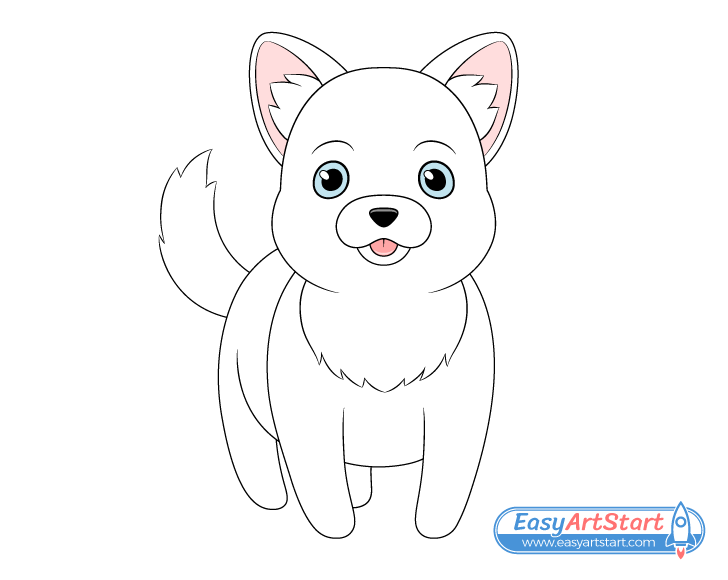
In this example the dog is white so coloring it is quite simple. Make the eyes blue, the inner areas of the ears a light pink and the tongue a darker pink (closer to red). You can leave a lighter strip along the tongue’s bottom to show a reflection. This will help make it look moist.
Make the pupils of the eyes and the nose black. Similar to the tongue leave a lighter strip on the nose (this time along the top) to again show a reflection.
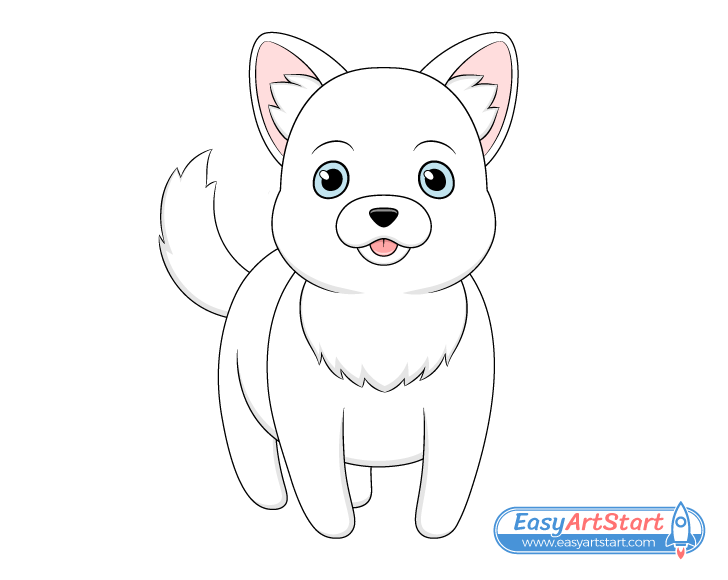
To help the drawing stand out more you can also add a little shading. However, this is optional so if you want to have an easier time you can leave it as is after coloring.
When shading a drawing (even a stylized one like the example) you should consider the lighting conditions you wish to show. In this example the dog is shaded as though it’s in a well lit environment with the light coming from above (for example, outdoors during the day).
For such a setting you can place the shadows as follows:
- Outer edges of the ear clumps
- Lower ends of both parts of the snout
- Upper end of the tongue
- Bottom of the head
- Bottom of the tail
- Lower ends of the fur clumps of the mane
- Bottom of the body
- Bottoms of the feet and inner sides of the legs
Generally because the light is coming from the top most of the shadows will be cast downward and will therefore be along the bottoms of the different parts of the dog. However, the inner sides of the legs are somewhat closed off from the light and therefore will also have shadows.
Conclusion
This guide show an easy way to create a nice drawing of a cute looking dog. As mentioned at the start of the tutorial, the dog is drawn in a style similar to a cartoon, anime or comic book. Drawing in such a way can be interesting and helpful as it allows you to exaggerate or simplify certain parts of your subject to help achieve a particular look.
In this guide the goal was to make the dog look cute and it’s accomplished by giving it a big head with big ears, big eyes, and a playful expression/posture.
The guide also provided some tips that can be applied to art in general. These include comparing the size of one part of your drawing to another, drawing in a logical order and properly positioning your drawing.
If you like these kinds of detailed step by step guides also be sure to try the following:

